Showing posts with label Guide. Show all posts

How To Create Scatter File For MTK Devices


These are the instructions on how to create Scatter File for MTK Devices including MT6572, MT6577, MT6582, MT6589, MT6592, MT6595.
Requirements: You need to have a MTK chipset based android device, USB cable, and some commonsense to perform easy tasks.

Create Scatter file for MTK Devices

Step 1: Enable USB Debugging mode on your smartphone. To Enable USB Debugging: Settings > Developer Options > USB Debugging (Tick to enable it).
(Developers Option is hidden for Android 4.2.2 or above, to show this option Go to Settings > About Phone > Built Number (Tap on it for 5-8 times).
Step 2: Download and install Android ADB Driver on your computer (compatible with almost every android device).
USB Logo
Step 3: Once driver installation is completed, connect your MTK chipset based android device to the computer through the USB cable.
Connect mobile to computer
Step 4: Download MtkDroidTools on your computer and extract it any where on your computer.
Extract_MtkDroidTools
Step 5: After extracting you will be able to see the following files:

Step 6: Now, Open MTKdroidTools.exe file on your computer and wait till it loads your android device information.
Open-MtkDroidTools
Step 6: Once, device information is loaded successfully, click on Blocks Map to continue.
MtkDroidTools Blocks Map
Step 7: Under a new window blocks information will be displayed. Now, you need to click on the Create Scatter File button.
MtkDroidTools-Blocks_Info
Step 8: Now, it will ask where to save the Scatter File. You can save it anywhere on your computer. Once you are ready click on Save Button to begin the Scatter creating process.
MtkDroidTools Save Scatter
Step 9: Thats It. You have successfully created the scatter file for your device. Congratulations.
MtkDroidTools-Extracted

How To Flash / Unbrick Samsung Phones Using Odin Flash Tools


These are the instructions to flash Samsung Stock ROM (original firmware) using Odin on Windows Computer.
Requirements: Your Samsung Smartphone should have at-least 30-40 percent of phone batter to perform the flashing process.

Flash Samsung Stock Rom using Odin

Step 1: Download and install Samsung USB Driver on your computer. In case you have already installed the Samsung USB Driver on your computer then Skip this step.
USB Driver Logo
Step 2: Download (Stock ROM compatible with your device) and extract it on your computer. After extracting you will be able to see these kind of files:
Samsung Galaxy Stock ROM
Step 3: Now, Enable USB Debugging on your Samsung Galaxy Device. To enable USB Debugging: Open Settings > Developers Option > USB Debugging > Tick to enable.
(Developers Option is hidden for Android 4.2.2 or above, to show the developer option Go to Settings > About Phone > Built Number (Tap on it for 5-8 times).
Enable USB Debugging on Samsung Stock
Step 3: Power Off your Samsung Device.
Power Off Samsung Galaxy
Step 4: Now, you have to boot into Download mode. To boot into Download Mode: Press and Hold Volume Down Key, Home Key and Power Key. When phone vibrates Leave the Power Key but Keep holding the Volume Down Key and Home key. You will boot into the Download Mode.
Download Mode on Samsung Galaxy
Step 5: In the Download mode you will be able to see a Warning Yellow Triangle Sign. In this situation you have to press the Volume up key to continue.
Samsung Galaxy Warning Sign
Step 6: Download and extract Odin on your computer. After extracting you will be able to see the following files:
Odin files for Samsung Galaxy
Step 7: Now, Open Odin3 and connect your phone to the computer.


Step 8: Once you have connected the phone to the computer, Odin will automatically recognize the device and show “Added” message at the lower-left panel.
Samsung Galaxy Added to Odin
Step 9: Once your device is detected by Odin, click on the “PDA” button and select the tar.md5 file that you have extracted in Step #2.
Add PDA File in Odin
Select PDA file
Step 10: Now, click on the “Start” button in Odin to begin the Flashing process.
Start Flash in Odin
Step 11: Once you see, the Green Pass Message then remove the USB cable from the device (during this process, your device will restart automatically).
Samsung Flash Completed in Odin
Step 12: Your Samsung Device will now stuck at boot (boot loop). Now, You have to boot into Stock Recovery Mode, To Enable Stock Recovery mode: Press and Hold Volume UP key, Home Key, Power Key. When phone vibrates Leave the Power Key but Keep holding the Volume UP Key and Home key. You will boot into the Recovery Mode.
Recovery Mode on Samsung Galaxy
Step 13: In Recovery Mode, Wipe Data/factory reset.
Step 14: Once Cache Data is cleared, Select Restart Phone Now from the recovery menu.
Reboot System Now from Stock Recovery Mode
Step 15: Now, your Samsung Device will restart without any issue with the Stock Rom you have flashed.Open Odin3 for Samsung Galaxy

Keep in Mind:
[*] Data Loss Process: Flashing Stock ROM is always a data loss procedure. So, always take backup of your personal data before flashing the Stock ROM.
[*] Flashing Stock ROM or Downgrading Stock ROM does not void your Phone warranty. So, dont worry Just Flash the Stock ROM.
Downloads:

How To Backup / Unbrick MTK65XX Using MTK Droid Tools


Mediatek devices are hugely popular because they run well and are relatively cheap to produce. The more popular these devices become, the more people create mods to add some personalisation and sometimes this goes wrong, this is why learning how to unbrick your phone is always worthwhile and you really never know when you might need it.
Things you need to have, apart from your Android phone and USB cable are:
  • ADB Drivers for your phone from here (If your phone is not getting detected).
  • MTK Droid Tools from here.
OK, all downloaded? We’re ready to go then.
1. Extract the MTK Droid Tools and run the program.
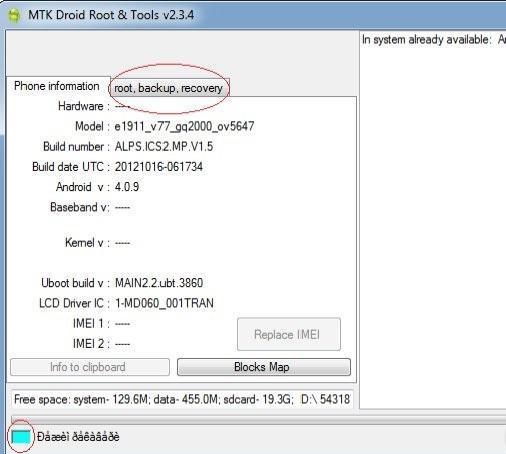
2. Plug your phone in (with USB Debugging enabled) and you should see a screen like this one, the blue status bar shows that your phone is succussfully connected:
side-drawer

3. Go to the ‘root, backup, recovery’ tab, as circled above.
image
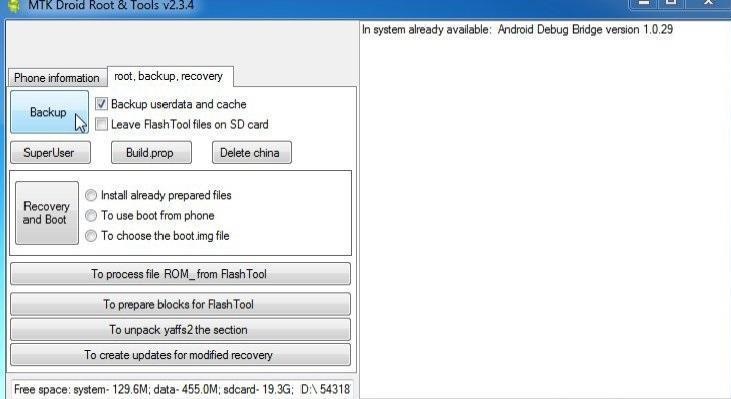
4. Check the ‘Backup userdata and cache’ box (as shown above) and click ‘Backup’.
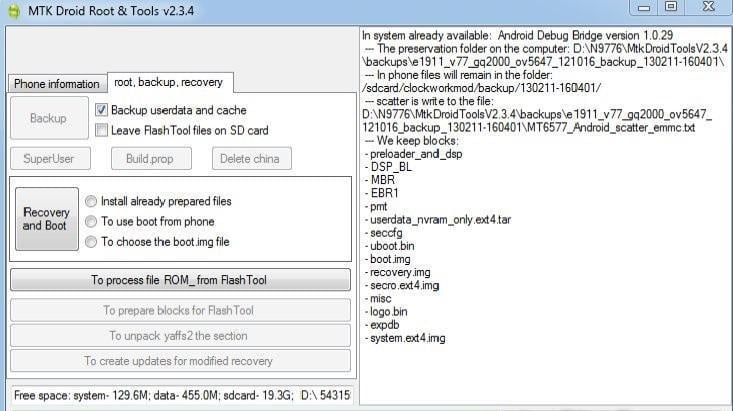
5. Now your full current ROM will be backed up, this part may require some patience as it can take a while. You’ll get a screen like this:
image-1

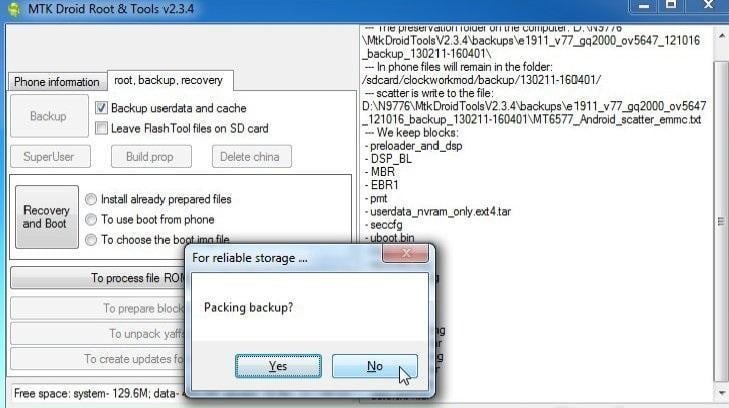
6. You’ll get a pop-up asking if you want ‘Packing Backup?’ Select ‘No’ as seen in the image below.
image-2

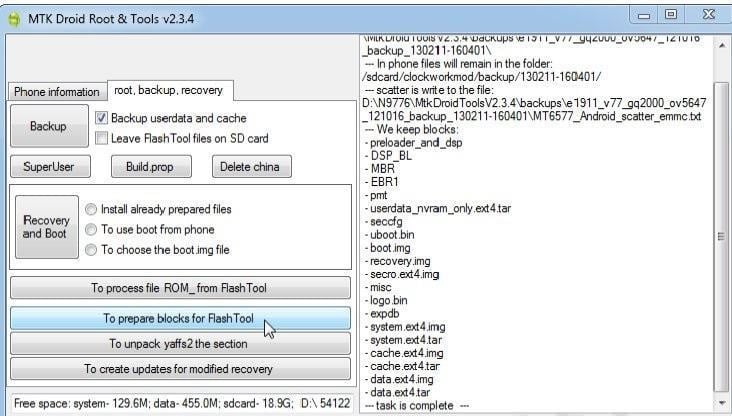
7. Once the ROM backup is complete then click on ‘To Prepare Blocks For FlashTool’ as can be seen below:
image-3

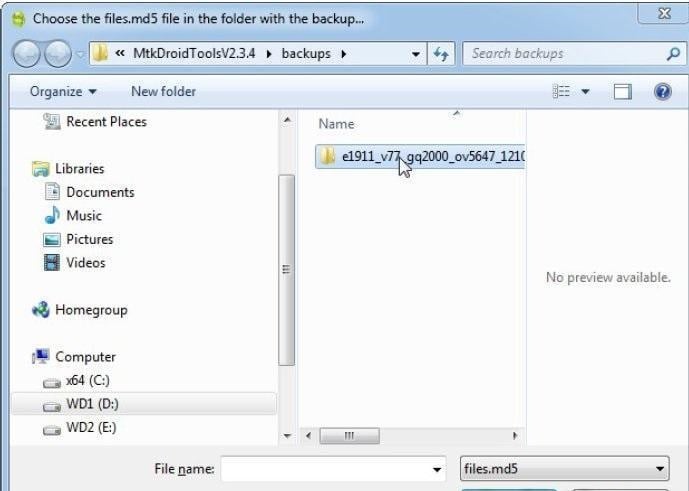
8. Next you have to select the the md5 sum file, to do this just browse the backups folder and there’ll be a folder entitled with the name of your phone. Open this folder.
image-4

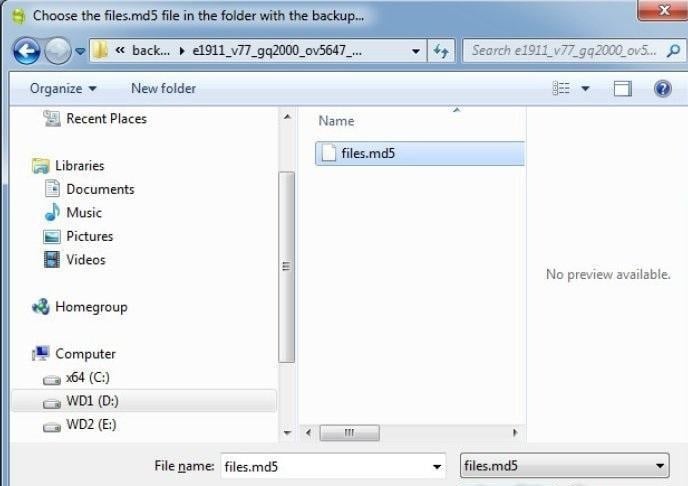
9. Inside this folder is a file entitled ‘files.md5′, click on it.
image-5

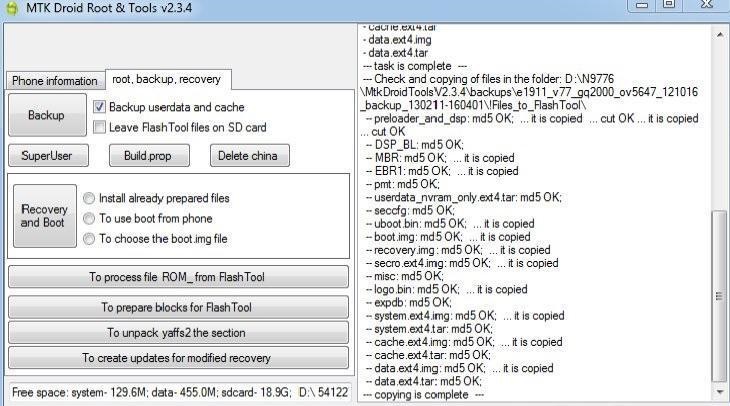
10. After selecting files.md5 you’ve completed the creation of Blocks for Flash tool, and you’ve backed up your ROM.
image-6


To proceed with Unbricking your phone, follow with these steps.
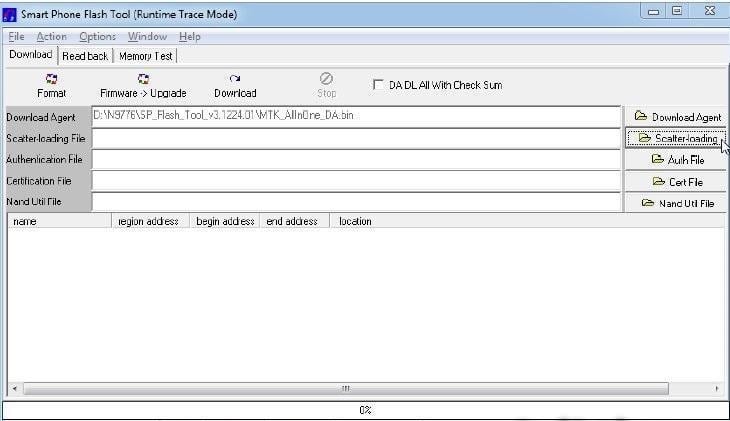
11. Open SP flash tool and select ‘scatter loading’
image-7

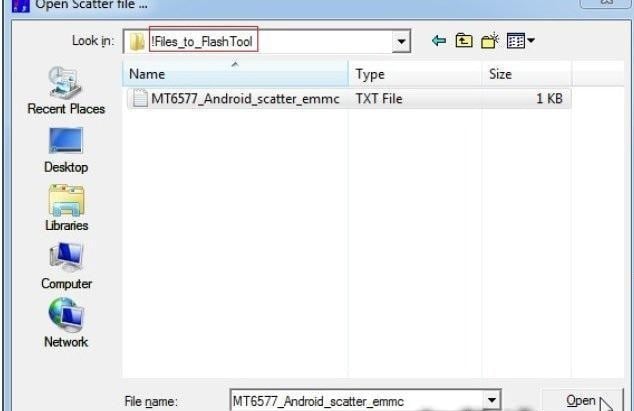
12. Look for iFiles_to_FlashTool and click the txt file inside then ‘Open’, as shown below:
image-8


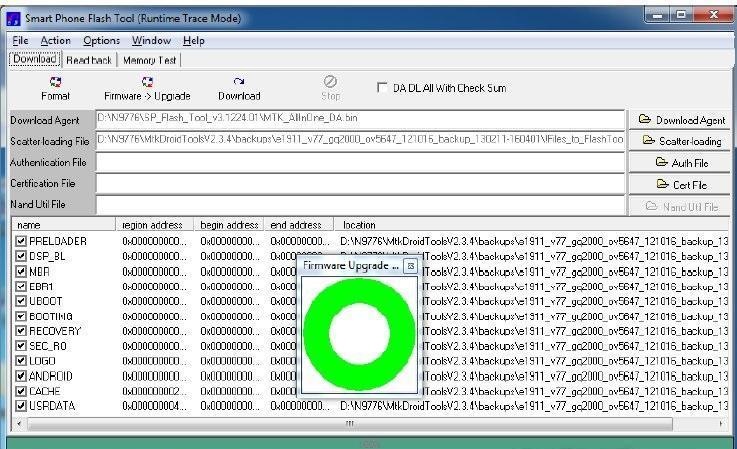
13. Next you should see a screen like this one:
image-10
If you’ve reached this point, it should be the end of your troubles, your phone is fixed!
Now according to your problems here are the solutions:
14 a) If you are stuck at bootloop then just select ANDROID(system.img),  You don’t need to post the whole ROM again.
14 b) If your phone is hardbricked then just click on Firmware>Upgrade to download the whole ROM
You may need to remove the battery but for some phones this is not necessary. When you’re finished you will get a screen like this:

[ROOT ANDROID][2.x-5.0] KINGROOT: The One-Click Root Tool for Almost All Devices


KingRoot 4.1 has been released, support Samsung Galaxy S6,S5(4G), Note3(4G), SONY Z3, Samsung X64, SONY 5.0, just try it, mate!

We just release new KingRoot. This one will support SAMSUNG S6, S5(4G), Note3(4G), Lenove K3-Note, Gionee S7. What is more, we can close Sony_RIC perfectly now, you don't need re-root after reboot anymore~ Thank you very much~

If you still can not remove KingUser, please try to force stop KingUser, clear data of it and root with KingRoot again. Then try to unroot

Disclaimer
  1. Root has risk and may be voids your warranty.
  2. We have two versions, one is mobile version( app) for one-click root, another is desktop version for root some special device which can not be rooted by mobile one. Attention please that the desktop version may be flash third party Recovery into your device.
  3. Please check information in "DETAILS and RMARKS" section carefully before you decide to root your device by KingRoot.


MD5 Hash: 15b0641e492fdb04c62ac07177d9cd56

MD5 Hash: 3cdc5a8f9c6eb80a41b06e5ec0854cfc


SUPPORT LIST


Support Android Version: 2.2 , 2.3 , 4.0, 4.3, 4.4, 5.0


DETAILS and REMARK

WHAT'S INSTALLED

#SU Binary
Generally, Su Binary will be installed in System/xbin to ensure that you can keep root access permanently

#KingUser
Just like SuperSu, KingUser will be installed in your System/app(default) or Date/app to manage your root access. What's more, Kinguser also provide some other functions, you can use them to remove apps(system) and disable autostart items >>>Download KingUser<<<

#KingMaster
This app also produced by us and has ability to purify your system. KingMaster can make apps hibernation automatically which you have exited but still running in background. What's more, she also can archive notifications for you. just like your housekeeper. Kingmaster will be downloaded and installed in your Data/app

#Desktop KingRoot(optional)
KingRoot desktop version used to deal device which can not be rooted by KingRoot app. You can download it according to tutorial in KingRoot app. Desktop version is an expert in SAMSUNG root field, if your SAMSUNG device can't root, just try it >>>Download Desktop Version<<<

Attention:
1. KingMaster and Desktop KR still have no English UI, we will release English version as soon as possible.
2. Desktop KR may be flash third party Recovery into your device, if you want to keep in stock, please don't use it.
3. If you don't like idea of KingMaster, you can remove it without any problem.
4. Root access will lose if you remove KingUser, re-install KingUser can get root back if you lose it. >>>Download KingUser<<<
5. Install SuperSu to replace KingUser may be cause some unknown error, although you do can do this.


1. For KingRoot app: just download, then install it into you device. Run it , done! KingRoot will do every other thing for you.
2. For KingRoot Desktop version: download it from official website into your computer, then connect your device to computer. After connect successful , just click "开始root" (start root). Done! Waiting for root.


[GUIDE][HOW-TO]Easily root Galaxy Grand 2 (SM-G7102)


This is a tutorial for noobs or members who are new to Rooting and want to root their phone.

Downloads:
*Odin 3 v3.0.9
*CWM recovery thread(Downloads available for 4.3 and 4.4 also)
*SuperSU

Steps to root your phone:
1) Download the first two files given above to your laptop/PC.
2) Turn off your phone.
3) Go to download mode (by pressing Vol.down+home+power buttons at the same time for about 7-8 secs)
4)Open the ODIN file you downloaded on your laptop/pc.
5) Connect your phone to your laptop/PC through USB cable.
6) When ODIN detects your phone, the ID:COM area will become yellow/blue
7) In ODIN click on PDA and then select the recovery file you downloaded. Also tick the check box beside PDA(if there is any)
8) Click on start. The flashing process will start.
9) If the flashing succeeds, ODIN will show 'PASS'. That means the recovery flashed successfully. Yay!!!
10) Now turn on your phone and download the third file and place it in your external SD card.
11) Turn off your phone.
12) Reboot to recovery(by pressing Vol.up+home+power buttons).
13) The recovery will start. You have to navigate by volume buttons and power button.
Vol.up - move up
Vol.down - move down
Power button - select option
14) Select 'install zip'.
15) Select 'Choose zip from ext_sd or external SD card'.
16)Select the third file you downloaded. Flashing process will start.
17) After it finishes, go back and reboot your phone.

It's upon you, of you want to follow this:
18)Use Knox Remover to remove all Knox files.

Kategori

Kategori