SP Flash Tool Mediatek Flashing Utility MTK Android Tool


SP Flash Tool is a brilliant and easy to understand device intended for MediaTek gadgets. Android Smartphone Flash apparatus underpins streak stock, introducing custom recuperation and firmware overhauls. SPFlash instrument is exceptionally strong when you Flash stock ROM,unbrick or introducing custom recuperation for your Mediatek gadgets.

On the off chance that you are utilizing the diffuse SP Flash is particularly simple to use with CWM and proper programming and driver establishment. Download Smart Phone Flash Tool for Windows and Linux OS. Cell phone Flash instrument is for MTK devices,compatible with both 32 and 64 bit adaptation

Basic Tutorial:

  Do you want to change the stock ROM of your Android Device or your stock ROM has got corrupted ? Then in this tutorial we’ll guide you to the process of using the SP Flash Tool (Smart Phone Flash Tool) to install the custom ROM on your android device.
Requirements: Your phone must have at least 40-50% of battery and USB Drivers
Now let’s explore the steps
STEP 1: Download and Install the android USB drivers on your computer. In case you have already installed   them, you can skip this step.
STEP 2:  Switch Off you Android Phone and Remove the battery in case it is removable.
Power-Off-Android
STEP 3: Now download the stock ROM or the custom ROM which you want to install on your phone. After downloading, extract the zip file on you system.
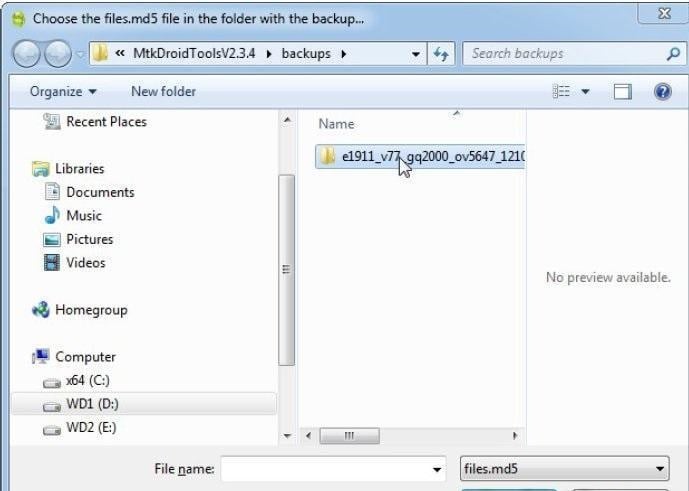
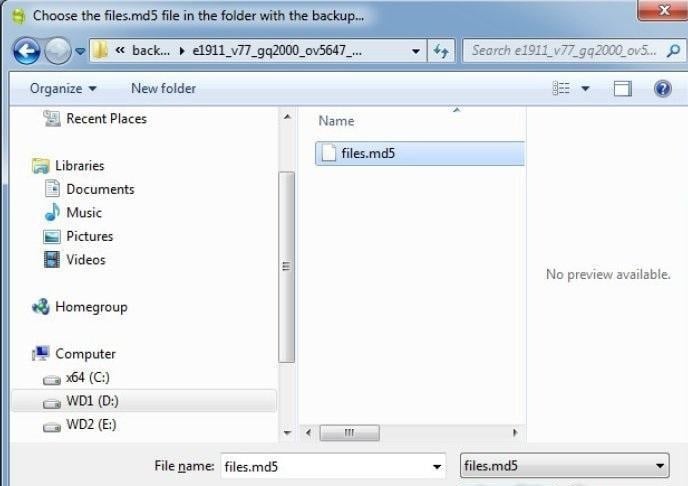
STEP 4: Download the SP Flash Tool on your system and extract the downloaded zip file on your system. After that you can see the following files listed.
sptool- techsultan (1)
STEP 5: Form the files listed run the Flash_tool.exe file.

f
sptool- techsultan (2)
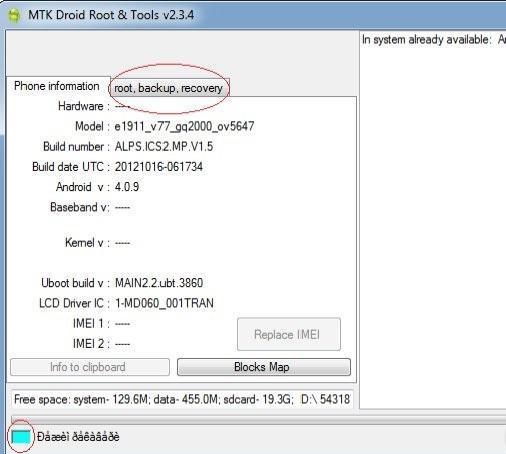
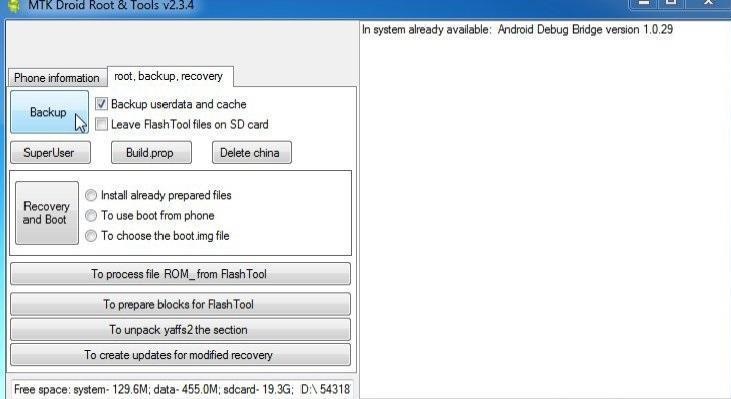
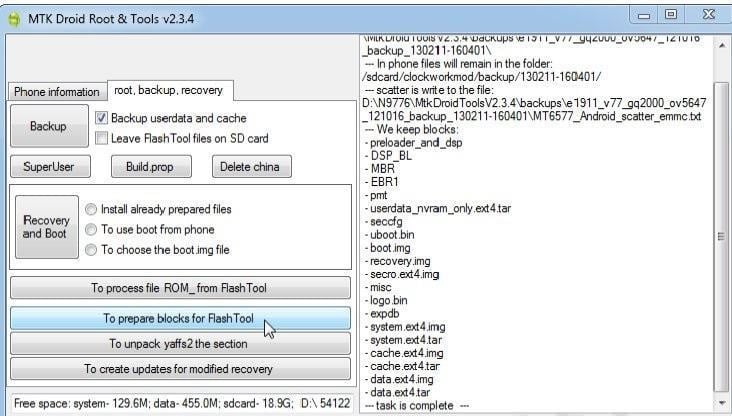
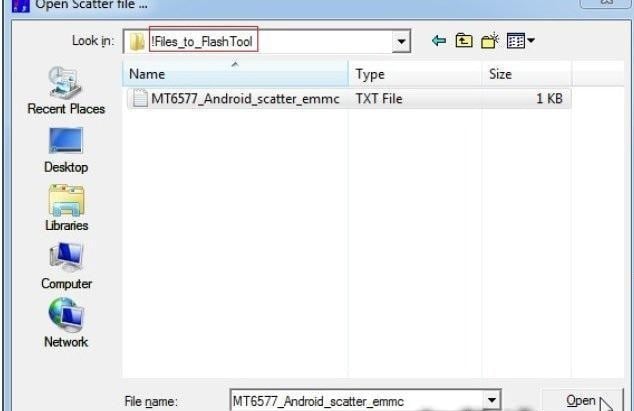
STEP 6: Once the SP Flash tool is started, click on the Scatter-Loading button located in the right 
side
  sptool- techsultan (3)
STEP 7: Now locate the scatter file in your custom or stock ROM. It is generally located in the bin/ directory.
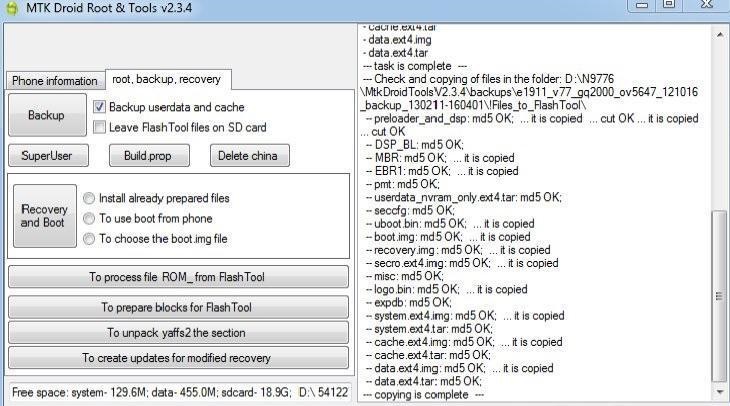
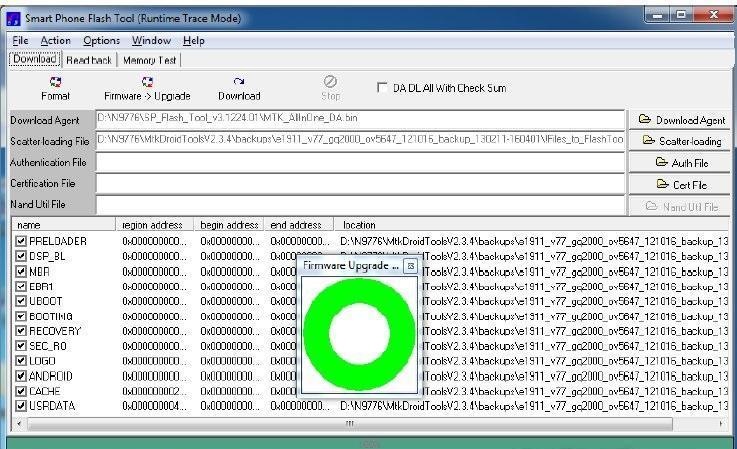
STEP 8: Now click the Download button to start the downloading process.
sptool- techsultan (5)
STEP 9: After completed all the above steps, connect your smart phone to your system using the USB cable and     press any button other than power button so that your system will detect your device. You can use volume                 buttons.
sptool- techsultan (4)
Step 10: Once the flashing process is completed, a green ring will appear on your system. Now disconnect your         device and switch it ON.


SP Flash Latest Change Logs [5.1524.00]
  • Flash custom ROM
  • Android stock ROM flashing (Scatter based)
  • Fixes bricked devices
  • Advanced testing and verifying memory
  • Reset, format and erase MTK device
  • Write, read parameters

SP Flash Download – System Requirements

  • Download SP Flash Tool f
  • MediaTek USB VCOM driver downloads [get it through above official site]
  • Scatter file and flashing files
  • CWM recovery.img
  • A Windows/Linux PC
  • USB cable of mobile device

MediaTek USB VCOM Drivers Manual Installation

MediaTek USB VCOM driver download and installation properly connect your MediaTek device to PC properly.

Video Tutorial on how to Flash MediaTek devices with SP Flash Tool

Android SP Flash root instrument is the best apparatus for MTK Android gadgets. blazing, introducing custom and stock ROM and numerous different components. Download cell phone Flash apparatus for your Windows or Linux PC alongside different records by means of above connections/Official website.

How To Create Scatter File For MTK Devices


These are the instructions on how to create Scatter File for MTK Devices including MT6572, MT6577, MT6582, MT6589, MT6592, MT6595.
Requirements: You need to have a MTK chipset based android device, USB cable, and some commonsense to perform easy tasks.

Create Scatter file for MTK Devices

Step 1: Enable USB Debugging mode on your smartphone. To Enable USB Debugging: Settings > Developer Options > USB Debugging (Tick to enable it).
(Developers Option is hidden for Android 4.2.2 or above, to show this option Go to Settings > About Phone > Built Number (Tap on it for 5-8 times).
Step 2: Download and install Android ADB Driver on your computer (compatible with almost every android device).
USB Logo
Step 3: Once driver installation is completed, connect your MTK chipset based android device to the computer through the USB cable.
Connect mobile to computer
Step 4: Download MtkDroidTools on your computer and extract it any where on your computer.
Extract_MtkDroidTools
Step 5: After extracting you will be able to see the following files:

Step 6: Now, Open MTKdroidTools.exe file on your computer and wait till it loads your android device information.
Open-MtkDroidTools
Step 6: Once, device information is loaded successfully, click on Blocks Map to continue.
MtkDroidTools Blocks Map
Step 7: Under a new window blocks information will be displayed. Now, you need to click on the Create Scatter File button.
MtkDroidTools-Blocks_Info
Step 8: Now, it will ask where to save the Scatter File. You can save it anywhere on your computer. Once you are ready click on Save Button to begin the Scatter creating process.
MtkDroidTools Save Scatter
Step 9: Thats It. You have successfully created the scatter file for your device. Congratulations.
MtkDroidTools-Extracted

How To Flash / Unbrick Samsung Phones Using Odin Flash Tools


These are the instructions to flash Samsung Stock ROM (original firmware) using Odin on Windows Computer.
Requirements: Your Samsung Smartphone should have at-least 30-40 percent of phone batter to perform the flashing process.

Flash Samsung Stock Rom using Odin

Step 1: Download and install Samsung USB Driver on your computer. In case you have already installed the Samsung USB Driver on your computer then Skip this step.
USB Driver Logo
Step 2: Download (Stock ROM compatible with your device) and extract it on your computer. After extracting you will be able to see these kind of files:
Samsung Galaxy Stock ROM
Step 3: Now, Enable USB Debugging on your Samsung Galaxy Device. To enable USB Debugging: Open Settings > Developers Option > USB Debugging > Tick to enable.
(Developers Option is hidden for Android 4.2.2 or above, to show the developer option Go to Settings > About Phone > Built Number (Tap on it for 5-8 times).
Enable USB Debugging on Samsung Stock
Step 3: Power Off your Samsung Device.
Power Off Samsung Galaxy
Step 4: Now, you have to boot into Download mode. To boot into Download Mode: Press and Hold Volume Down Key, Home Key and Power Key. When phone vibrates Leave the Power Key but Keep holding the Volume Down Key and Home key. You will boot into the Download Mode.
Download Mode on Samsung Galaxy
Step 5: In the Download mode you will be able to see a Warning Yellow Triangle Sign. In this situation you have to press the Volume up key to continue.
Samsung Galaxy Warning Sign
Step 6: Download and extract Odin on your computer. After extracting you will be able to see the following files:
Odin files for Samsung Galaxy
Step 7: Now, Open Odin3 and connect your phone to the computer.


Step 8: Once you have connected the phone to the computer, Odin will automatically recognize the device and show “Added” message at the lower-left panel.
Samsung Galaxy Added to Odin
Step 9: Once your device is detected by Odin, click on the “PDA” button and select the tar.md5 file that you have extracted in Step #2.
Add PDA File in Odin
Select PDA file
Step 10: Now, click on the “Start” button in Odin to begin the Flashing process.
Start Flash in Odin
Step 11: Once you see, the Green Pass Message then remove the USB cable from the device (during this process, your device will restart automatically).
Samsung Flash Completed in Odin
Step 12: Your Samsung Device will now stuck at boot (boot loop). Now, You have to boot into Stock Recovery Mode, To Enable Stock Recovery mode: Press and Hold Volume UP key, Home Key, Power Key. When phone vibrates Leave the Power Key but Keep holding the Volume UP Key and Home key. You will boot into the Recovery Mode.
Recovery Mode on Samsung Galaxy
Step 13: In Recovery Mode, Wipe Data/factory reset.
Step 14: Once Cache Data is cleared, Select Restart Phone Now from the recovery menu.
Reboot System Now from Stock Recovery Mode
Step 15: Now, your Samsung Device will restart without any issue with the Stock Rom you have flashed.Open Odin3 for Samsung Galaxy

Keep in Mind:
[*] Data Loss Process: Flashing Stock ROM is always a data loss procedure. So, always take backup of your personal data before flashing the Stock ROM.
[*] Flashing Stock ROM or Downgrading Stock ROM does not void your Phone warranty. So, dont worry Just Flash the Stock ROM.
Downloads:

How To Backup / Unbrick MTK65XX Using MTK Droid Tools


Mediatek devices are hugely popular because they run well and are relatively cheap to produce. The more popular these devices become, the more people create mods to add some personalisation and sometimes this goes wrong, this is why learning how to unbrick your phone is always worthwhile and you really never know when you might need it.
Things you need to have, apart from your Android phone and USB cable are:
  • ADB Drivers for your phone from here (If your phone is not getting detected).
  • MTK Droid Tools from here.
OK, all downloaded? We’re ready to go then.
1. Extract the MTK Droid Tools and run the program.
2. Plug your phone in (with USB Debugging enabled) and you should see a screen like this one, the blue status bar shows that your phone is succussfully connected:
side-drawer

3. Go to the ‘root, backup, recovery’ tab, as circled above.
image
4. Check the ‘Backup userdata and cache’ box (as shown above) and click ‘Backup’.
5. Now your full current ROM will be backed up, this part may require some patience as it can take a while. You’ll get a screen like this:
image-1

6. You’ll get a pop-up asking if you want ‘Packing Backup?’ Select ‘No’ as seen in the image below.
image-2

7. Once the ROM backup is complete then click on ‘To Prepare Blocks For FlashTool’ as can be seen below:
image-3

8. Next you have to select the the md5 sum file, to do this just browse the backups folder and there’ll be a folder entitled with the name of your phone. Open this folder.
image-4

9. Inside this folder is a file entitled ‘files.md5′, click on it.
image-5

10. After selecting files.md5 you’ve completed the creation of Blocks for Flash tool, and you’ve backed up your ROM.
image-6


To proceed with Unbricking your phone, follow with these steps.
11. Open SP flash tool and select ‘scatter loading’
image-7

12. Look for iFiles_to_FlashTool and click the txt file inside then ‘Open’, as shown below:
image-8


13. Next you should see a screen like this one:
image-10
If you’ve reached this point, it should be the end of your troubles, your phone is fixed!
Now according to your problems here are the solutions:
14 a) If you are stuck at bootloop then just select ANDROID(system.img),  You don’t need to post the whole ROM again.
14 b) If your phone is hardbricked then just click on Firmware>Upgrade to download the whole ROM
You may need to remove the battery but for some phones this is not necessary. When you’re finished you will get a screen like this:

Kategori

Kategori